5 Steps To Organize Your Makeup

You know what I love ALMOST as much as I love organizing? Makeup! It makes me feel good and gives me that little pick-me-up when I need it.
Finding fun, creative ways to organize my makeup is how I blend my love of organizing with my love of makeup. I have a built-in makeup vanity, so my makeup organizing is totally on point. But, I know how easy it is for beauty products to get out of hand.
I think we’re all guilty of buying makeup we don’t need, don’t use or thought we’d like someday. And, we often don’t think about the best way to organize our makeup. As a result, bathroom counters can quickly become seemingly insurmountable messes. So, I put together these five easy steps so you can easily organize your makeup.

How to Organize Your Makeup: 5 Easy Steps
1. Take inventory of the makeup that you currently have.
The first step was to gather together all of Caitlin’s makeup from her makeup bags, her bathroom and her purse. She laid them all out on her counter and put all like items next to each other. This critical step allowed her to see just how much of each product she had.
2. Purge what you don’t use.
She had recently purged her makeup, but realized that there were still a handful of products that she didn’t really love either because the coloring wasn’t quite right, she didn’t like the texture, or she’d found another that she liked more. To truly transform the way she organizes her makeup, purging the stuff she didn’t need was crucial. She was a champ!
3. Keep what you love.
Of course, it follows that you should keep what you love. But, be sure to keep ONLY what you love. This is often where decision fatigue can come into play for my clients. Most of us can’t decide if we should keep something or not. I get it! Here’s my rule of thumb: when it doubt, throw it out! If you can’t decide whether it serves you or not, it doesn’t. Moving on!
4. Group items by category.
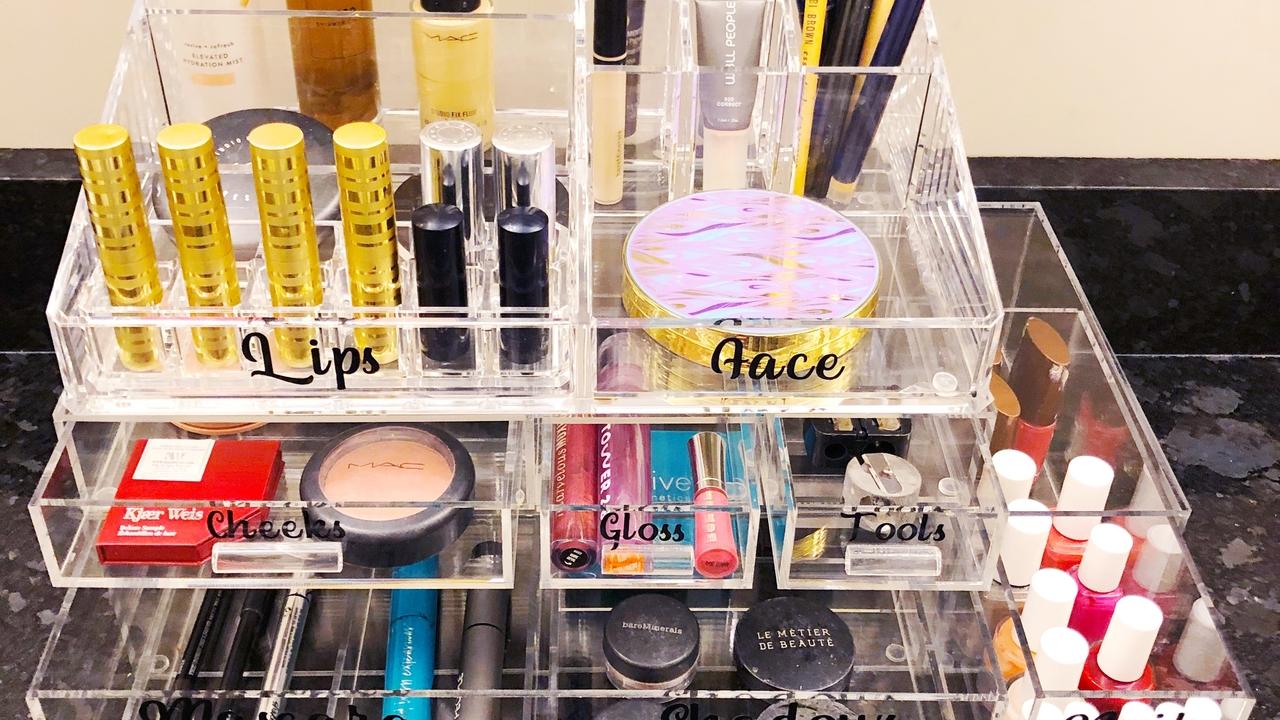
After we determined how much makeup she had post-purge, it was time to turn to the first organizing step: grouping. We grouped the makeup into the following categories: Lips, Face, Cheeks, Gloss, Tools, Mascara/Liner, Shadows, and we couldn’t forget about . . . nails! Keeping all the same category items together not only makes getting ready so much quicker, but also ensures that you no longer buy what you already have. Win win!
5. Consider what containers your makeup would best fit into.
With a clear picture of what exactly she has and uses, it was time to go shopping for the perfect organizing products. We love to buy products that allow us to maximize space and keep our counter space open. The Luxe Acrylic Makeup Organizers from The Containers Store are so fab because you can customize and stack them to fit your needs.
The Large Modular Drawer, the Luxe 2-section Drawer, and the Short 2-drawer divider are meant to serve as the base. They fit right under the Acrylic Makeup Organizer, and are perfect for items that need to lie flat like eye shadows and powders. You can see that we put her mascara, eyeliners, shadows on the very bottom drawer. Above that are the products for her cheeks, her lip gloss, and makeup tools.
We then stacked the Acrylic Makeup Organizer right on top. It was perfect for taller items like lipstick and brushes!
Now, Caitlin’s busy mornings of getting her kids ready before heading to a Grid + Glam client will run that much more smoothly!
What do you say — are you ready?
If you’d love to get and stay organized (in every area, not just your makeup), download my FREE G+G Roadmap to Organizing Your Home for GOOD! This 5-page PDF download teaches my signature four-step process to organize your entire home & keep it that way.
I am a proud Container Store Ambassador and these products were gifted to me from the Container Store. The links provided are affiliate links, which means I earn a small commission if you order through them. All opinions expressed are my own. I only share products that I genuinely use and love.


